Cocoa Vanilla Studio: Wild At Heart: Love You....


Hi Creative Friends!

Welcome back for more Cocoa Vanilla Studio Wild At Heart inspiration!
Today I am sharing a layout that makes a real feature of that pretty marbled paint pattern paper, the reverse side of GROW WILD CV-WH007.


Super pretty paper, huh?!!!
I absolutely LOVE this marble design but often find these types of patterns difficult to use - but not today!
Let me show you why.....

"Love You"


Oh swoon! Isn't this just divine?!! Pretty, pretty, pretty!
The colours and swirls in this pattern paper are SO dreamy! Pastel perfection! It kinda reminds me of melting rainbow gelato icecream!!!
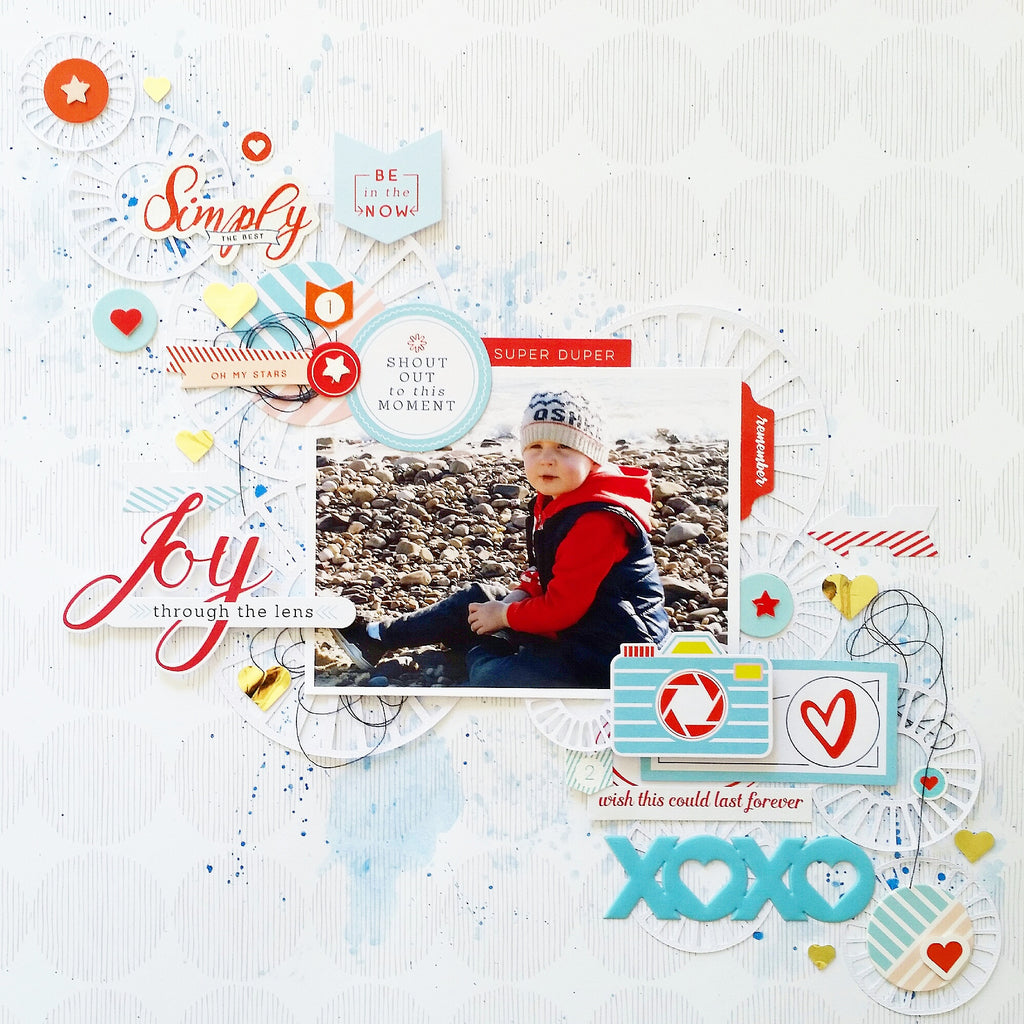
That stunning center chipboard frame is the source of my inspiration for today's layout design. As soon as I saw it, I knew I wanted to incorporate the 'marble frame' look into my scrapbook page. I have layered my cardstock and reverse side of GROW WILD paper to achieve this!
For those of you who like accuracy and numbers, the exact measurements are 1 sheet of 12" x 12" cardtstock, the marble paper is 11" x 11" & my inner layer is a second sheet of cardstock, and is 8" x 8". I have machine stitched both my cardstock layers to add soft texture and dimension to the layout. I also added a watercolour, mixed media base to matte my chipboard framed photo onto. I tried to create a complimenting wash that drew on the sweet pastel colour combination.
And of course, I had to fussy cut out those sweet butterflies from the pattern paper, PATCHWORK CV-WH004! I have positioned them to follow the 'flow' of the marble swirls, and to create movement within such a controlled layout design. Enough chatter though!

Let's take a closer look at all this pastel perfection....


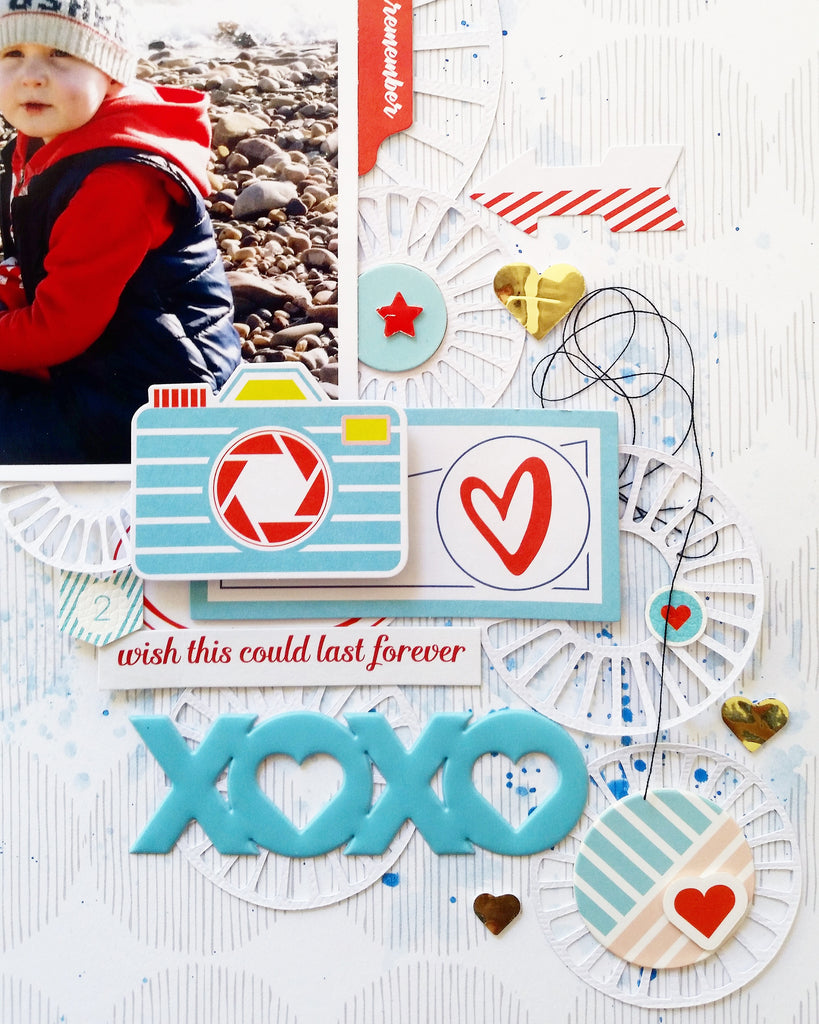
So divine! That frame really is a beautiful adornment to my photograph! I added the 'sweet' DIE CUT EPHEMERA arrow to the top of the frame to guide you into my darling photograph, and the 'memories' one at the bottom to keep your eye travelling.  You'll also spy some type writer font journal stickers from the ACCESSORY STICKERS sheet, CHIPBOARD STICKERS, ENAMEL DOTS (SPARKLES) & a WOOD VENEER too! Those hearts are perfect! The blue chippie one keeps with the fluid water colours, while the veneer one adds warmth and balance. Love it!


That 'Enjoy the Little Things' ephemera is actually an Accessory Sticker. I simply backed it with a little scrap paper, and mounted it with double thick foam tape. I also added lilac cotton floss beneath it, as well as beneath my frame. There's also some French blue cotton beneath one of my butterflies - the cotton adds dimension and texture but maintains a certain softness and delicacy to the layout. Pretty!


I can't go past the WOOD VENEER words - the cursive script is so fun, and the veneer is so exquisitely cut! Here's another view of them....


They really are something! Wow!
And there you have it! My layout using the stunning Wild At Heart collection!
I hope my layout has inspired you to get creating with this beautiful new range!
Thanks for visiting and leaving a comment - it means so much!
til next time,

Happy Arty Days, 
Amanda xo 

Pinkfresh Studio: Love More with Live More....


Hi Creative Friends!

 I have been so inspired by all the gorgeous Valentine's Day creations this month that today I'm sharing a lil love myself with the fabulous Pinkfresh Studio LIVE MORE line!

"XOXO"


Isn't this just lovely?!! This is magic, indeed!
And yes, that's me & my true love - a rare photo of us together! 
I was totally inspired by the xoxo design on the pattern paper, "Honest", and all those sweet sentiments too! As soon as I saw that pattern paper, I knew I wanted to create a large XO to layer my photo onto. I just love how it turned out!
I also used the reverse side of my "Honest" scraps to cut out those sweet striped and marble hearts. Love them! 
I used the pretty polka dots paper, "Simple" as my layout base, added an 11.5" x 11.5" white cardstock layer & then some Lindy's Stamp Gang Magicals for the mixed media base. Gorgeous!
My 'XO'  title was a little hard to see, so I outlined it with black pen to really make it pop!
Once this was glued into place it was time to layer and embellish - my favourite part! There are just SO many stunning embellishments in the LIVE MORE line! 

Let's take a closer look at them.....


Omgoodness! Yessss! Copper foil is the signature highlight color for this collection! So shiny and pretty!!! I especially love the Foiled Chipboard Stickers, Foiled Die Cuts and Puffy Alphabet Stickers (I used the asterisks on my layout) - just stunning! 


The Studio Puff Stickers are always a favourite of mine too! They add such dimension to layouts without being bulky and clumsy. And seriously, could that diamond sentiment be any more on pointe?! Love the Puff! An absolute Must Have item for my supplies!
The Phrase Stickers are another staple item of mine, and I've added one as a subtitle to my layout; 'You Make My Heart So Happy'. Perfection! 
And last, but definitely not least, the Paperclips!
Oh my! These are so cool, and while I intend on using them in my planners and travelers's notebooks, I just couldn't resist tucking that 'LOVE' one onto my photograph. An exquisite embellishment for a polished finish!

And there you have it!
My first layout with the stunning new LIVE MORE!
I hope I have inspired you to get creating with it!
Thanks so much for stopping by!
til next time,

Happy Arty Days,
Amanda xo  

Paper Issues: February Swag Bag


Hi Happy Arty Days Fans!

It's time for one of my favourite shares on the Paper Issues calendar, 


It's no secret how much I LOVE the Paper Issues Swag Bags!
I often refer to them as lil gems or bags of gold, cause they're that awesome!
A sampler bag if you will, of what's hip, cool, sassy and fun in the Paper Issues store!
I have fallen head over heels for the January bag...
I actually ordered two of them - one for scrapboooking and one for planning!

Here's a peak at my planner with the January Swag Bag....


So much prettiness!!! 
You can see a video and more pics of my planner spread over on my 

And here's my layout! It's created entirely from the January Swag Bag 
(except for  the 12 x 12 cardstock & watercolor paints - they're from my stash) .....

"ADORED"


More prettiness! Told you the Swag Bags are lil gems!
How totally divine is this?!! I love you indeed my darling daughter!
A whole ton of my kinda embellishments here - glitter stickers, clear stickers, wooden buttons & sequins! Love them all! 
In keeping with the hearts theme, I cut out those polka dot hearts from the 3 x 4 cards that you get in the Swag Bags. The black and white really breaks up all that pink and makes everything pop!


All those hearts!
And speaking of hearts, how about that stunning fringed heart below....


Gorgeous! The heart actually had a Happy V Day sentiment on it, so I simply used a sticker to cover it. Works perfectly now! All the heart eyes! 


Love the  3 x 4 & 6 x 4 cards in the swag bags - they're always so complimentary and coordinating to all the embellishments.
And seriously, ALL those embellishments!!! SO much in such a cute lil bag!


Love me a Swag Bag or two!!!
 I hope my layout has convinced you to get yours on subscription so you don't miss out next month! 
(At only $9.99 USD, they sell out super fast!)
Find out more about the Swag Bags here
& REMEMBER : Use my code AMANDA to save 20% off your total!


See what the rest of our amazing team have created on the Paper Issues blog here.

Thanks for stopping by today, 
til next time, 

Happy Arty Days, 
Amanda xo 

Paper Issues: Scrap 'n' Chat Challenge


Hi Friends!

Welcome back for a bonus challenge this month with Paper Issues!

Today we're hosting a super fum Scrap 'n' Chat day  in our Facebook group here - stop in, say hi and join in on all the latest scrapbook gossip! ;)
& play along with the challenge too!

Here's what the challenge looks like.....


Super fun! Simply take 8 and create! Yay!!! 
This is my kinda challenge - lots of possibilites! 

Here's what I came up with......

"Sweetheart"


Oh my!!! Isn't this just delicate and pretty! A bit like my sweet subject in the photograph!
I've stashbusted Crate Paper Maggie Holmes Gather collection and combined it with Crate Paper's Heart Day line - just gorgeous! You'll spy fussy cutting and a fabulous FREE cut file from the Paper Issues store.
But which 8 did I use? 
Gold, mist, staples, paperclip, tag, label, chipboard & washi
Did you spot them all?

Here's a closer view........


 Those fussy cut blooms are just divine! As is that wreath cut file!!!
So much pretty going on here!


The acetate tag and those xo paperclips are perfect embellishments for this sweet page!
Love it all!

Now it's your turn! Show us what you got! Play along here.

Need Crate Paper & scrapbook supplies? 
Use my code AMANDA in the Paper Issues store here and you'll save 20%off your total order! 
You can also grab all those amazing FREE cut files here too
YAY!!! Happy shopping lovelies!


Thanks for stopping by today!
til next time, 
Happy Arty Days,
Amanda xo 


Paper Issues: February Roll The Dice


Hi Everyone!

Welcome back for another fabulously fun Paper Issues challenge! 
It's time for the February edition of 


This month the dice decided that we would create a project with;
5 photos & at least 3 circles
I don't normally use so many pics in the one layout, so this was a challenge for me! But tons of fun! 
Here's what I created....

"Adventure Boy"


Such an awesome boy! My biggest adventure for sure!
How cool is this layout design too?! 
I've used the stunning Pinkfresh Studio Indigo Hills line, and a Maggie Holmes Specialty (Foil & Acetate) Paper from her Shine collection. The acetate paper was full of quotes and frames, which I pretty much used in a pocket page fashion. Love the effect!
All my cool boy pics are mounted on the fabulous frames, and I went for a quote which suited my journaling needs. Perfect! 
Here's a closer look....


Those frames are SO awesome! 
And I must mention my vertical title! 
Love the alphas in the Indigo Hills collection; they have a matte finish and are just divine to work with! 
Now, for the circles element! 
I know most people will do a fancy circles cut file, so to demonstrate a different look I used circular ephemera & wood veneer. I also used a circle punch on those pattern papers too! To compliment the circles, I used that incredible blue splatter paper (cos those droplets are quite round in shape) as well as some enamel dots from my stash. 
Here's a better look ....


So cool!
Love this boy and all his adventures!

You can get Pinkfresh Studio and all your favourite brands at Paper Issues here
*REMEMBER: Use my code AMANDA and you'll save 20% off every order*


Need more ideas for using 5 photos with circles? 
See what our amazing team has created on the Paper Issues blog here. 

Thanks for stopping by, 
til next time, 

Happy Arty Days, 
Amanda xo 


Paper Issues: February Mix It Up Monday


Hi Creatives!

Welcome back for more Paper Issues fun with this month's edition of....


I love getting messy!
This month's challenge is really fun, & easy too!
Simply use embossing powder on your creation - anyway you like! 

Here's what I created....

"Dream"


And what a dream girl she is! Love my beautiful daughter! 
And how very pretty are all those butterflies too?!
For the challenge, I've used a variety of butterfly stamps from my stash 
(I think they're mostly Kaisercraft ones?)
& embossed them in white powder to create that super pretty background.
Here's a closer look.....


Aren't those embossed butterflies stunning?!! So delicate and soft!
Such a beautiful technique for a background!

Speaking of butterflies, what about all those fussy cut ones?


Beautiful! Love the Moonstruck line! Soooooo pretty!
And those cork embellies....


Swoon! The cork is flecked with gold foil!!! All.the.heart.eyes! Love these!
Here's another view of those stamped butterflies....


Just stunning!!!

And there you have it! My take on using embossing powder in a project!
Can't wait to see your interpretations of this fun challenge!
Need supplies?
Grab yours from the Paper Issues store and use my code AMANDA to save 20% off every.single.time you order!


Need more ideas and inspiration? Visit the Paper Issues blog here for more awesomeness!

Thanks for stopping by!
til next time, 

Happy Arty Days, 
Amanda xo 

Cocoa Vanilla Studio: Wild At Heart: LOVE YOU!


Hi Happy Arty Days Friends!

Boy oh boy am I excited for today's love theme share with Cocoa Vanilla Studio!
I've been lucky enough to get my crafty fingers on the all NEW, super pretty, Wild At Heart collection!!!


To say it's pretty is an understatement! This is the most gorgeously girly and blooming beautiful collection EVER!
But rather than rave about, let's allow my layout to do the talking
(after all, a picture really does say a thousand words! )

"LOVE YOU"


I did say, most beautiful collection EVER!!! It truly is spectacular, and a bit special!
A perfect collection for scrapping my gorgeous daughter!
And oh, those butterflies!!! I need at least another 5 sheets of that paper!
Yes, paper! Those gorgeous butterflies have all been fussy cut from the patterned paper MARIPOSA. Just divine!!!
To create this pretty layout, I drew a large circle onto my cardstock, and added my watercolours over and around the circle. Once dry, I then machine stitched around the circle repeatedly to create a gentle textural look. I then glued my Mariposa butterflies into position, and filled the 'gaps' with DIE CUT EPHEMERA, WOOD VENEER, & ENAMEL DOTS {SPARKLES}. Love the result! So soft and pretty!


I used the fabulous CHIPBOARD STICKERS for my title, LOVE YOU. With an ombre pink, watercolour wash, these chipboard stickers are  really quite delicate! The font is pretty fun too!
Here's a closer view....


The chipboard is really complimented by that mixed media under colour, as well as the painterly look of the butterflies and flowers.
My beautiful photograph has been mounted onto that VELLUM SHEET - trust me when I say, you can't go without the vellum. Truly stunning!


Beneath the vellum, you'll spy the prettiest pale blue doily & delicate die cut butterfly from the ephemera pack.
The super sweet 'Perfect' & 'Memories' tabs that embellish my photo are from the pretty array of ACCESSORY STICKERS.


Those hearts! Wood veneer and chipboard make the perfect adornments!
For finishing touches, I used a die cut ephemera sentiment with foam dots over my special photo........


as well as some typewriter font Accessory Stickers for journalling....


Truly, what could be more perfectly pretty!!!
Swooning over the new Wild At Heart collection! 
Hope I've inspired you!
Thanks for visiting and leaving a comment - it means so much!
til next time, 

Happy Arty Days, 
Amanda xo 

Pinkfresh Studio: The Mix No.1: Joy Through The Lens!


Hi Happy Arty Days Friends & Fans!
Today I have a super fun boy layout for Pinkfresh Studio using their latest

The Mix No.1 collection!  

This is a purely embellishment collection, and is cleverly designed to coordinate and compliment with any papers in your stash! Awesome, huh?! 

But enough chatter, here's my cool boy - Mister A for Awesome - an absolute; Joy Through the Lens


How super cool is this?!!

I've taken inspiration from the circular design on the patterned paper, as well as the colours in my photograph. Now I did mention that The Mix No.1 is only embellishments, so before we get started:the base paper I've used is, "Wish" from the Dream On collection 
& the cut file is RADIATE from Just Nick StudioNow, let's talk design and all those scrumptious embellies!!!La la love the great 'mix' of embellishments, stickers & adornments in this collection, but I was really drawn in by the vibrant colours and the 'real life' sentiments most of all! I mean seriously, Oh my Stars this boy is truly a Joy Through the LensShout Out To This Moment! Perfection I tell you! Speaking of perfection, nothing looks better than layering your embellishments in clusters - here's a closer look.....


You'll spy SO many scrappy-liscious products in my clusters! The Card Stock Die Cuts are super cool & that cute camera, well it speaks for itself! Awesome!

I also really love the Layered Chipboard Stickers, and used a few of the circular shaped ones to compliment the circles design in the Wish pattern paper. I used the same approach with the delicate Leatherette Stickers, but I also added in that Leatherette Sticker sentiment, Simply the Best - as it's such a perfect fit for my page! 


Another item from The Mix No.1 that I have totally fallen for are the Phrase Stickers. To compliment my red/blue palette, I used the red and white ones to add a lil journaling; wish this could last forever. So sweet! Now to cut through all the red and blue, I introduced the Gold Foam Shapes to scatter through my layout - they are SO shiny!!! Adore them!But, I've saved my favourite item from The Mix No.1 for last...Puffy Stickers


I heart puffy stickers as much as the next person does, but seriously, these Puffy Stickers are something else! For starters, they're mostly cool words and phrases in bright, happy colours - but it's their matte finish which really makes them pop! I used the stunning XOXO as a subtitle to my layout & truly, without it my page would be missing that polished, finishing touch. Love, love, love the Puffy Stickers!And there you have it!My first layout with The Mix No. 1! I hope I have inspired you to get creating today!

Thanks for stopping by, til next time, 

Happy Arty Days, Amanda xo